Project Priorities v1.x.x
- Vasyl Krokha
You are viewing documentation for older version of Project Priorities add-on v1.x.x. Please check documentation for the latest version 2.0.x.
About Project Priorities add-on
Depending on the type of a project in JIRA you may want to have 'Priority' issue field options to speak the project language, for example:
| Project A priorities | Project B priorities | Project C priorities |
|---|---|---|
|
|
|
But this is not possible in JIRA by default. Priorities are managed as global options list in JIRA administration section and all are always shown in 'Priority' issue field selection options.
How Project Priorities add-on helps
Project Priorities add-on introduces the concept of Priority Schemes where you enable only required priorities:
Priorities scheme can then be added to your JIRA project:
So that JIRA end users can only select priorities from specified options in Priorities Scheme linked to a project:

While by default the selection list would look like:
How to install
- Log into your JIRA instance as an admin.
- Click the admin dropdown and choose Atlassian Marketplace.
The Manage add-ons screen loads. - Click Find new add-ons from the left-hand side of the page.
- Locate Project Priorities for JIRA via search.
The appropriate add-on version appears in the search results. - Click Try free to begin a new trial or Buy now to purchase a license for Project Priorities for JIRA.
You're prompted to log into MyAtlassian. Project Priorities for JIRA begins to download. - Enter your information and click Generate license when redirected to MyAtlassian.
- Click Apply license.
- If you're using an older version of UPM, you can copy and paste the license into your JIRA instance.
Admin's Guide
Priority Scheme aggregates set of JIRA priorities and can be linked to a project to restrict 'Priority' field selection to priority options defined in the linked scheme.
You need to have a JIRA administration permissions to create and manage Priority Schemes as well as standard JIRA priorities.
You can navigate to Priority Schemes configuration section via "Configure" link after after "Project Priorities" add-on installation completed.
Create and manage Priority Schemes
Step by step new scheme configuration:
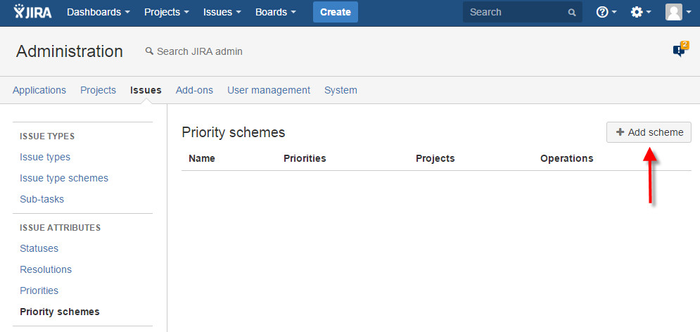
Step 1: create new scheme
Click "Add scheme" button on "Priority Schemes" screen:
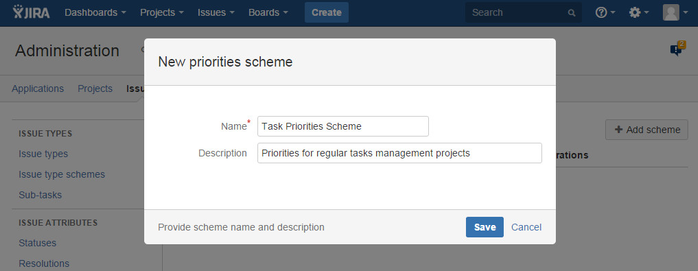
Step 2: specify scheme details
Provide name and description for your priorities scheme in a "New scheme" dialog and click "Save":
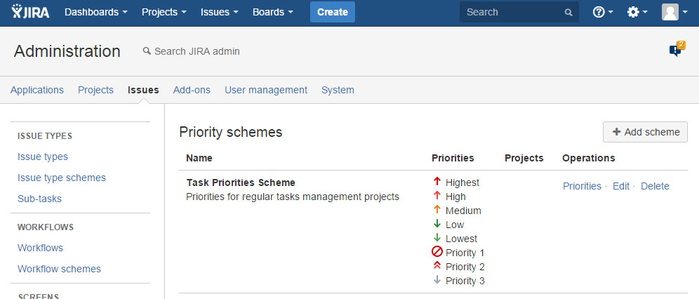
Step 3: check current priorities of a scheme
By default all existing priorities of your JIRA are enabled in a new scheme
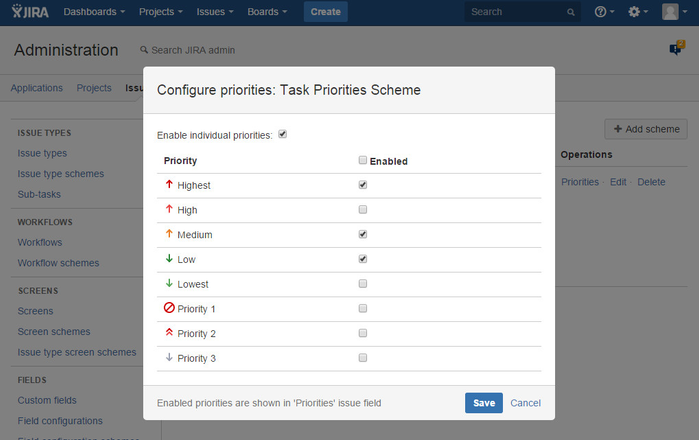
Step 4: configure scheme priorities
Click "Priorities" action link to change priorities of a scheme in the opened configuration dialog. By default all priorities are enabled and you should set "Enable individual priorities" checkbox to be able to configure custom set of priorities and then click "Save".
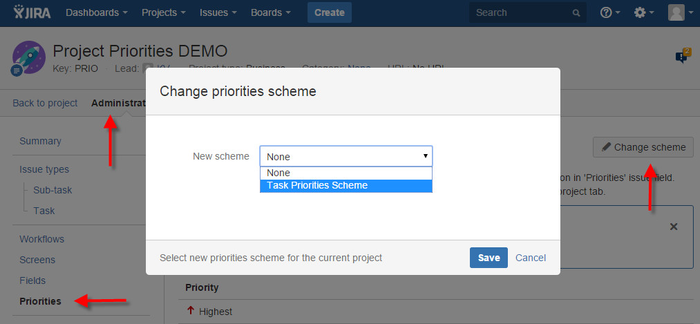
Step 5: link scheme to a project
Once a scheme is configured with required set of priorities you can link it to your projects. This can be done in the "Priorities" administration tab of any project. Click "Change scheme" button and select a required scheme from all available schemes list. Select "None" to unlink project from any scheme. In that case all existing JIRA priorities will be available for selection in 'Priority' issue field for this project:
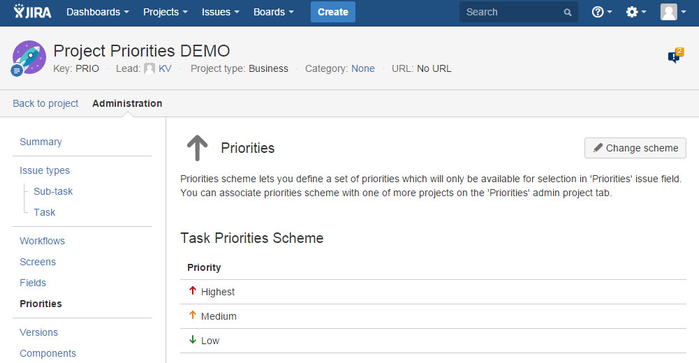
Step 6: check project priorities
All available priorities configured via priorities scheme or without are shown in the "Priorities" project administration tab. If project is associated with Priorities Scheme then scheme's name is displayed as well:
User's Guide
The functionality of "Project Priorities" add-on is absolutely transparent and doesn't require any additional actions while editing priorities of issues in 'Priority' issue field.
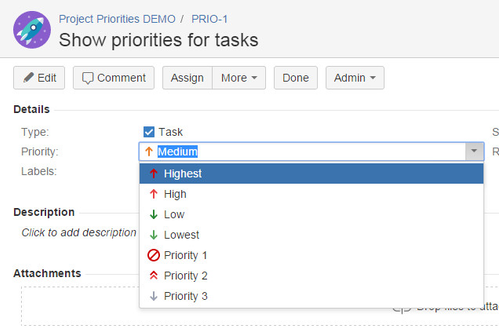
Project priorities applied
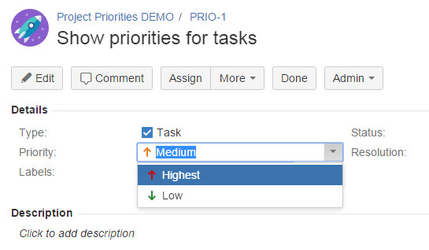
When "Project Priorities" add-on is installed and Priorities Scheme is configured and applied to a project similarly to our configuration example your JIRA end users can select priorities defined in Priorities Scheme:
| Inline edit | Edit issue | Create issue |
|---|---|---|
 |  |  |
Project priorities not applied
Without "Project Priorities" add-on your JIRA end users will always select from global list of JIRA priorities which often is not the best way to do:
Support & questions
Please, contact us via the following support channels if you have any questions or need help with Project Priorities add-on.